Helping dogs have more fun with their humans!

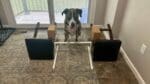
It can be hard to find ways to entertain your pup inside, especially if you work during all the daylight hours or the weather outside is poor. We recommend having at least a few ways to burn some energy inside for these situations, such as a DIY flirt pole. Our DIY flirt pole is Prim’s favorite type of enrichment that doesn’t involve food and Goomba enjoys it a lot, too!
Even if you’re bad at DIYs, making a dog flirt pole toy is easy! We’re here to walk you through this in 3 easy steps and provide some alternatives if you don’t have specific tools. This is one of our favorite DIYs since it’s cheap, easy, and will last you an eternity.
What is a flirt pole?

A flirt pole is essentially just a pole with a string holding on a lure, toy, or another item for your pup to chase. The idea is to make it move around erratically so your dog wants to chase it. Flirt poles generally work best for dogs with a high prey or play drive. It’s a great way to redirect some of the pent-up energy from that squirrel that keeps raiding the bird feeder to a more positive experience for your pup.
As an alternative, you can tie a toy or lure on a piece of rope and use it without the pole. We don’t recommend this because if your dog catches the toy, you’ve bought a one-way ticket to rope burn. The pole allows you to change the direction of the lure much quicker than without it and provides a safe spot for you to grip.
We’ve also seen some modifications that use food instead of a toy at the end of the string. We have much better luck with the toy variant, but if you have a pup who is unwilling to participate without food, you could use this as a starting point.
If you’re looking for alternatives to a DIY flirt pole, but still want some good inside activities for your pup, check out our article on our favorite inside games. We even have a lower-impact section with DIY dog puzzles and frozen lick mat recipes. Our dogs love all of them, especially on rainy days!
Benefits to a flirt pole
Before we get into how to make your own DIY flirt pole, let’s touch on some of the benefits of using a flirt pole to play with your dog.
Exercise & fun for your dog

To touch on the obvious, the primary goal of making your DIY flirt pole is to have fun with your dog!
In our experience, it’s generally much more difficult to find fun activities inside for your dog, so we love having various options for rainy days. A flirt pole makes a great option since you can burn off some energy even in a small space!
Anything that gets your dog moving around: chasing, or sniffing will be a blast for your pup. If you’re lucky enough to have a high play or food drive pup, it’s much easier to entertain them.
If you’re looking for other fun activities you can do inside, check out our posts on using the other side command to burn some energy and DIY dog agility course for beginners. Both are excellent ways to get your pup moving inside!
Increases play drive

Another great benefit of a DIY flirt pole is to help your dog build play drive!
If your dog doesn’t care for toys as much as treats, like Prim initially for us, getting your pup to participate in playtime can be difficult. Chasing a flirt pole combines both prey drive and play drive, which is great for a pup who is still learning to like playtime. Prim has times of the day when she is much more willing to play but doesn’t have as much interest during other times. If Goomba even thinks we may be getting a toy, he sprints toward where the toys are.
If you control the scarcity of the toy and remove it before your pup has lost interest, they will tend to be more excited to play! This can be an entire article, but for now, just remember to store the toy out of reach of your pup, remove the toy before they quit, and try to catch them when they’re acting playful or at least moving around. You’ll be on your way toward a more playful pup!
Obedience work

Another benefit of flirt poles is that you can work on obedience training simultaneously!
There are quite a few commands that you can practice during playtime, especially with a DIY flirt pole. Some of our favorites are “leave it” and our chase command “get it“, but you can work on whatever you want. “Sit” and “down” also make great commands; you can work these in during whatever command you use as a release. Most pups could use a little additional impulse control work, and any work that helps progress your dog’s ability to disengage when they’re doing a high-reward activity is great.
Goomba has an extremely high play drive, so working in obedience work during his play sessions is great to help him understand what we’re asking him to do and to help reinforce the behavior.
If you need help with the learning process for your pup, check out the Puppr app! We love it, and it makes learning new tricks a breeze! We’re working on “look back” with our pups as of writing this!
Great way to burn energy in small spaces

Another reason we like using DIY flirt poles is because they are a perfect way to burn energy in a small space. If you live in a townhome or smaller house, as long as you have a clear small area, you can use a flirt pole with your pup! Most of the traditional fun ways for your dog to burn some energy require at least a decent amount of open space, which makes them much more challenging if that isn’t an option for you. We routinely use flirt poles on medium-sized rugs, since both of our pups appreciate the extra traction.
If you have a smaller dog, you can even get away with smaller spaces with that!
How to make a DIY flirt pole
Finally, the part you’re here for! Let’s get started on making your DIY flirt pole!
Gathering supplies

One of the reasons we think a DIY flirt pole is great is the low cost! Here’s the supply list, which totals about $12, if you have PVC cement/primer:
- PVC pipe (24″, we recommend 1″ due to the stiffness)
- PVC cap (1″)
- 6′ or so of string, rope, or cord (we recommend something softer)
- PVC cement/primer
If you don’t have the following, you may need to borrow these tools:
- Drill
- Drill bit larger enough to make a hole for the string to go through
- A tool to cut PVC if it’s over 2′ (pipe cutter, hacksaw, etc)
That’s it! We could find 24″ segments of PVC, which eliminates the need for cutting completely and saves you a tool to cut them!
If you don’t want to mess with PVC cement, we’d recommend finding a piece with a threaded end and cutting it. If you do that, you’ll also replace the linked cap with one that is threaded, as well! We don’t particularly enjoy PVC cement, but had some on hand.
Creating the pole
For the first step, all you have to do is cut your PVC to about 24″, if it’s not that length already. We liked this length because it reduces the risk of hitting overhead light fixtures…which we found out afterward.
Next, take your PVC cap and drill a hole in the top. If it’s easier, you can put it on the pole first to keep it from moving.
Finally, take the PVC primer and cement and use them to attach the cap to one end of the pole. Make sure to follow the safety and usage instructions on the can. The primer, specifically, is hard to get off clothing and is bright purple, generally. If you have a threaded connection, simply thread it on and you’re ready to go!
Attaching the cord

For the second step of creating your DIY flirt pole, we will be making the rope.
You can use whatever you want, we recommend something that ties easily, is durable, and is not too rough. We used paracord, like this option from Amazon, but there are a lot of other options. The paracord is perfect for a DIY flirt pole for large dogs if you’re in the same boat as us! If you can find a material that’s flat instead of round, like shoelaces, that would be preferred but round is fine too.
Put one end of the cord through the top of the cap and then grab it from the open end of the pole. Tie the end in enough knots so that it won’t slide through the hole you drilled. Now pull the knot so that it touches the cap. Tie another set of knots just outside the hole you drilled. That’s it!
The goal is to have knots both inside and outside of the hole in the cap so the string can’t slide out of the PVC pole when your dog pulls on it. It doesn’t have to be perfect, just secure.
Attaching the toy or lure

For the last step of creating your DIY flirt pole, we need to attach the object that will be chased. You can use whatever your dog is willing to chase, but we recommend using a new toy they only get while using the flirt pole. This will keep their excitement as high as possible and help the pups who are less play-driven be more excited. We recommend finding the most obnoxiously squeaky toy you can to start. If you’re making a large dog flirt pole, we recommend something that is at least somewhat durable as the lure.
To attach a toy, tie the cord in a knot holding the toy in place. It doesn’t matter how it looks when it’s attached, but if it retains a functional squeaker, it will be even more exciting.
Some of the options we’ve had the best luck with are this BarkBox under-the-sea bundle (Amazon) and any of the Hyper Pet Real Skinz toys (Amazon). I don’t know how real the texture is on the Real Skinz, but Prim used it multiple times per day for weeks! If you have a discount store such as TJ Maxx, Gabes, or HomeGoods, you can usually get great toys there for about half of the cost of a normal store.
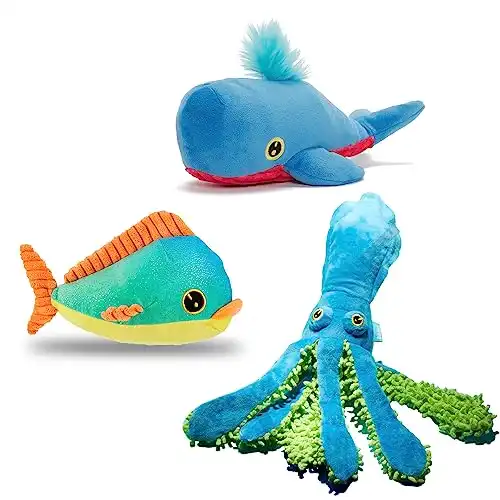
Barkbox Under The Sea Bundle (3 Toys for Large Dogs)
View on Amazon
$29.99
We earn a commission if you make a purchase, at no additional cost to you.
10/21/2024 06:17 pm GMT
If you want to use a food-based lure, you can try to use something like a Kong, that’s easy to tie and can hold some treats or other rewards easily. If your dog is peanut butter crazy, wipe some in the
Recommendations for pre-made flirt poles

If you don’t want to bother with making a DIY flirt pole, there are good options that are fairly priced wherever you shop.
Our personal favorite is the Squishy Face V2 Flirt Pole (Amazon). We can attest to its durability, as we’ve had this one for years and haven’t had any issues at all. Eventually, we had to replace the toy, but the initial toy lasted longer than we thought it would. This flirt pole was the first one we used with our pups. The only thing we didn’t like about it is that the cord stretches, which took some getting used to for us and our dogs. Other than that, we love it!
Our favorite!

Squishy Face Studio Flirt Pole V2 with Lure (Purple/Blue Tie Dye, Regular - 36 inch)
View on Amazon
View on Chewy
$27.99
We got our Squishy Face Studio flirt pole a long time ago and it's held up extremely well! We love their design and they offer replaceable lures if your pup manages to do too much damage to it. They're also fellow pitbull advocates, so if you want to help out and support someone who loves pitties as much as we do, give it a shot and you won't be disappointed!
We earn a commission if you make a purchase, at no additional cost to you.
10/22/2024 12:27 am GMT
As a bonus, you can attach a large variety of toys to it if the lure it comes with gets ripped up. In the picture for this section, we’re using a
If you prefer shopping somewhere else, here’s the Squishy Face Flirt Pole at Chewy and from Squishy Face Studio themselves.
Advice on using a flirt pole
Using a flirt pole is relatively straightforward, but we wanted to give some advice in case you’re having issues.
Most importantly, try to be sure not to hit your dog with the pole accidentally. It’s easier to do than you think (especially if you have a longer pole) and will make your dog think it’s a negative experience instead of a fun one. Try to catch your dog when they’re playful or active. They will be much more inclined to chase than when they are lounging.
As for playtime, it’s helpful to move the lure erratically. Put it behind furniture, dangle it above them, and change direction quickly. Acting excited and trying to amp your dog up will help a lot, too. Most dogs tend to have their prey drive stimulated when their DIY flirt pole moves like prey, so do your best to mimic random motions.
Make sure to have fun and keep it a positive experience! If you’re getting frustrated or your dog isn’t feeling it, store the flirt pole and try again later. We love giving our pups frozen Toppls after a particularly vigorous play session to help them cool down!
Conclusion

Creating your DIY flirt pole doesn’t have to be expensive or time-consuming! We love that using the flirt pole is an activity we can do inside or outside, which makes it perfect for those days when you can’t go outside. The cost per use is great, as all you’ll have to pay for is a new lure every once in a while.
Have you made a DIY flirt pole or any other dog enrichment tools? Share your photos of your dog trying them out with us on Instagram by tagging @therulybully. Have fun!