Helping dogs have more fun with their humans!

For the fourth installment of our DIY agility series, we’ll discuss DIY dog agility poles to do the command “weave”! The weave command is alternating sides through a series of obstacles (typically poles) by alternating which side your pup goes around.
We’ll walk you through the common issues and fixes, as well as how to create or buy different pieces of equipment. Whether you’re practicing agility inside or outside, want to build your own DIY dog agility poles, or just want to buy equipment, we have a solution for everyone.
In case you missed our guide here’s our post on how to make a DIY dog agility course! Make sure to check our blog for additional how-to articles as we post the most common obstacles and equipment for agility training!
Getting started
Before we get started with your DIY dog agility poles, let’s review some information that’s important to revisit.
If at all possible, try to have your obstacle on a rug or carpet instead of slick vinyl or tile. Outside is less of an issue, but try to stay away from slick surfaces, uneven ground, or any object that would be unpleasant if you run into it.
As always, please proceed carefully before starting any physical activity with your dog. If you are unsure, consult an expert, trainer, or vet. We are providing this guide for informational purposes, based on our own experiences and what works for the majority of pups.
Things to watch out for

If your dog is visibly sore from performing any activity, give him rest for a few days and evaluate how he or she is doing at that point. The primary goal of beginner agility is to have fun, and we’re trying to avoid any negative associations with the activity. We typically give our pups some sort of food-based enrichment such as a frozen Toppl or frozen Kong after they’re done to help them relax and help keep the experience as positive as we can.
If your dog has no real activity level at the moment, we’d recommend not doing any of the higher-impact activities for a while until he or she is used to being more active. Imagine how your muscles and joints would feel if you hadn’t run in years and tried to do hurdles. It’s the same for your dog.
DIY dog agility poles are one of our recommended ones to start with due to the lack of impact on your dog. It’s a much better place to start with for an older or less active dog than jumping over obstacles.
Again, we recommend consulting with an expert (vet, trainer, or other professional) if you’re not sure of your dog’s ability to handle any new activity.
Common issues and fixes
Not understanding the command

Of the agility commands, this one tends to be the most unnatural, at least in our experience. It’s not similar to any of the other commands and takes a little more work than most.
We have two different methods that we’ve used here with good results, depending on what you and your pup are the best at doing.
Option 1 is to space the poles out with enough distance between them so that you and your dog can walk between them. This works best if your dog has a good heel or is otherwise attached to your hip. Slowly walk in the pattern you wish your dog to take. Repeat until your dog seems to understand and then transition to option 2.
Option 2 is what we call the Prim method. Since Prim is so food-motivated, we can lure her into new behaviors very easily. Stand on one side of your poles or markers and use cheese, peanut butter, chicken, or whatever else your dog loves, and direct him or her to perform the weave motion.
Don’t use ‘Weave’ or any other command during this learning phase. After your pup understands the pattern, start saying the command while they’re performing the action. Gradually keep working the timing of the command back until it’s said before your dog performs the action. If your dog seems confused or fails more than 1 out of 10 times, go back a step and continue from there.
We’ve had the most luck with these two methods, but every dog is different. Drop us an email or message if you have something else that works!
Equipment options
Now let’s dive into how to create your own DIY dog agility poles. We’ll provide options for inside and outside, as well as options for if you need to be able to move them easily, want to build your own, or just want to buy some.
Outside
Pre-made
If you’re looking for something pre-made instead of making your own DIY dog agility poles, we have a good one for you. We like this Trixie’s set of weave poles for ease of adjustment and portability.
There are a whole slew of different options out there for agility poles. This is another obstacle where the quality of the equipment doesn’t make a lot of difference since your dog isn’t touching the obstacles. Basically, if they don’t fall down, they’re good enough.
A key feature that weave poles need to have is a way to secure them so they don’t fall down if your pup touches them. The most common method is a spike into the ground. It’s also nice if you can adjust the distance between the poles, but that matters more in the beginning.
Temporary

A great option if you’re looking for a temporary setup is driveway reflector poles. Here are some reflector poles from Amazon like the ones we use. Typically, you can find these cheaper in person at stores such as Walmart or Lowe’s.
These are great because they’re easy to stake in the ground, easy to adjust the interval, and quite easy for your pup to see. You can also repurpose them for your driveway in the winter.
Pick a distance to space the poles and try to keep the interval uniform between poles. It makes it much easier on your dog. For example, we typically do 2 of our feet, back to back.
Build your own DIY dog agility poles

If you’re interested in building your own DIY dog agility poles, it can be done for $20 or less! As a bonus, this set will work well inside or outside.
For materials, we’ll need some ½ inch or similar size PVC tubing (approximately three 8-foot sections should be more than enough), eight Ts of the same size, and two 90s. You’ll also want something to cut PVC if you don’t have a tool already.
We recommend cutting five 2-foot sections of PVC first. These will be the poles. Next, cut twelve 1-foot sections. That’s it!
For assembly, attach one of the 90-degree fittings to one of the 1 ft segments. Keep attaching 1 ft segments using the T fittings. After you attach the eighth 1 ft segment, attach the final 90. This piece is the base of the weave poles.

Next, place the 2-foot poles on both 90s and then every other T. There should be 5 total. Fill in the remaining 4 Ts with the last four 1 ft segments. We’re done!
The 1-foot segments between the poles are the stability legs. Rotate the Ts so they are flat on the ground to help hold up the poles.
Here’s a list of supplies you’ll need:
- 22 feet of PVC pipe (½ inch is recommended)
- 2 PVC 90-degree fittings
- 8 PVC T fittings
Optional supplies
- PVC caps (if you want to cover the ends so water doesn’t get inside)
- PVC cutting tool (if you don’t already have something to do this)
- PVC primer and cement (if you want to make certain pieces permanently attached)
Inside
Pre-made
There are a lot fewer options for indoor agility kits that don’t break the bank. There are quite a few cheap ones out there, but we’ve been less than impressed with the quality. In our opinion, it feels like a minor breeze could blow it over and the plastic is about as thin as it can get.
The next best option that we’ve found is this set of weave poles. It has supports on both sides and doesn’t have to be staked in.
Temporary

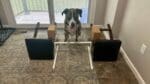
It’s easy to create a temporary indoor course for your pup! Anything that’s over 1-2 feet tall and has a small footprint is ideal. In our example, we used rolled up exercise mats, a foam roller, and a trash can.
The options are endless, especially if you have a somewhat open room.
Build your own inside DIY dog agility poles

We’re going to recommend the same setup for the outside DIY dog agility poles as for the indoor ones. In fact, we’d recommend using the exact same obstacle. The only modifications we’d suggest are to remove as many poles as you need to make it fit for indoor use. If it gets muddy, since it’s made from PVC, you can just wipe it off.
As the outside obstacle doesn’t need stakes, the legs for stability are perfect for inside use, as well.
Conclusions

Creating obstacles and practicing agility work with your dogs can be affordable and rewarding for both you and your pup! We recommend trying the temporary methods first or rigging up another removable option, so you can determine whether you and your dog enjoy practicing agility. You can always create your own DIY dog agility poles later if you and your pup enjoy it!
We’d love to see your success with DIY dog agility poles or any other obstacle! Share your photos of your dog trying out agility with us on Instagram by tagging @therulybully.
Have fun!